Arduino Alarm Clock Using a Real Time Clock and LCD Screen
Download : Arduino Alarm Clock Using a Real Time Clock and LCD Screen
Size: 638 MB
Description
Introduction:
The Arduino is a microcontroller that can be programmed to control various electronics. In this project, we will use Arduino to control a real-time clock and an LCD screen. The real-time clock will keep track of the time, and the LCD screen will display the time. We will use a button to set the time, and an LED to indicate when the time is up.
Welcome to this course:
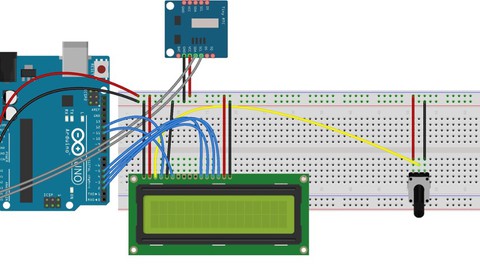
In this course, we’ll be using an Arduino to create an alarm clock that uses a real-time clock (RTC) and an LCD screen. We’ll start by soldering the RTC onto a breakout board, and then connecting it to the Arduino. Next, we’ll write code to set the time and date on the RTC, and then use that information to display the time on the LCD screen.
This course will teach you ways to create your own Arduino alarm clock and set the Alarming time and interact with Time and Date Variables efficiently and effectively, This Guide will take you in a very step by step manner to understand what each component inside this circuit is, and what it does and the way to wire it up, starting with the RTC DS3231 Time and Date Module and ending with resistors.
You will know what’s the particular working rule of the RTC Module and the way to interface and configure it correctly so you’ll make your Arduino Powered alarm, and look at the time and date additionally to initiate alarm action.